This tutorial covers the most commonly used features of wwwART for day-to-day
Web page creation tasks, and gives you tips on using wwwART to make "toadally
awesome" Web graphics; it doesn't go into detail on every feature of
wwwART. Read the Reference section of this manual, and monitor the "Tips
Library" area of the MicroFrontier Web site for additional ideas for
making the most of wwwART and how to make your web page's graphics grow
better by leaps and bounds!
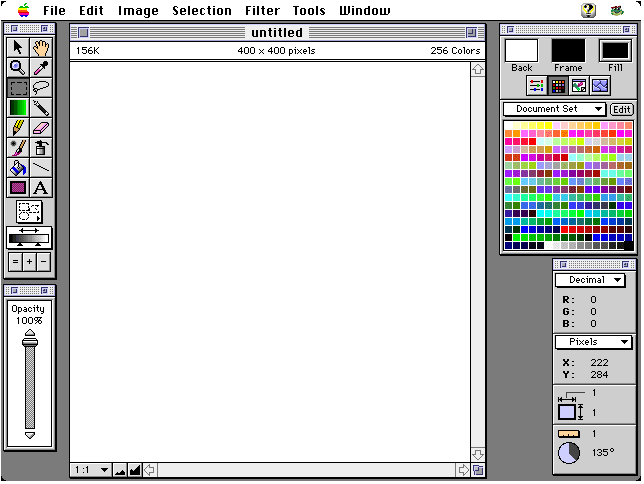
When you first run wwwART you are presented with a blank document, and several
"floating windows" which we call palettes. If you ever "close"
one of these 4 palettes you can open it again by picking the palette's name
from the "Tools" menu in the menu bar. These palettes and the
tools and controls available on them are used for drawing and retouching
images you have opened or scanned, and for drawing new images. There are
also "selection" tools for specifying areas of the image to alter,
copy to the clipboard, paste into, or drag-and-drop into other documents
such as Web Page creation programs.
Let's briefly go over the palettes and window controls provided by wwwART.
Here's what you'll see the first time you run wwwART:


The Tools Palette contains all the image selection and
editing tools such as brushes and shape-drawing tools.
The various buttons on the Tools Palette represent tools you can use to
edit the image or select portions to be acted upon, cut, copied, or moved.
Click on the various tool buttons to select and use them. The tool currently
in use will appear to be darker in color and "depressed"; in the
picture of the Tools Palette on this page, the Pointer (arrow) tool is being
used.
The bottom section of the Tools Palette, below the tool buttons, changes based on the type of tool you have selected. This area contains controls that let you adjust the way the tool you are using works. Here are some examples of the controls you might see at the bottom of the Tools palette:


Many of these controls are pop-up menus (indicated by a downward pointing
arrow like this ![]() somewhere in the control) ; click and
hold the mouse button when pointing at these to pop up the menu or control
and make a selection.
somewhere in the control) ; click and
hold the mouse button when pointing at these to pop up the menu or control
and make a selection.
For details on each tool and it's controls, read through the Tools Palette
chapter of the Reference section of this manual.
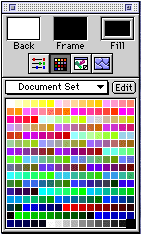 The Colors Palette lets you select
colors or patterns to be used as the background, foreground and fill colors.
You can select colors or patterns from a grid, or set them using individual
RGB (Red-Green-Blue) sliders.
The buttons below the Back, Frame and Fill boxes let you choose various color or pattern "pickers".
For details on this palette, see the Colors Palette chapter of the Reference
section of the manual.
The Back, Frame and Fill boxes at the top show your current
color or pattern settings and allow you to change them. Click on the Back,
Frame, or Fill box and then select a color or pattern using the bottom part
of the Colors Palette.
The Back box is used to select the background color of
the image; this is the color that will fill an area when you "cut"
an area out of the existing image, or when you erase an area using the erase
tool (note: it doesn't necessarily have to be white!) This box is also used
to set the transparent background color when saving a GIF file with the
"Make background color transparent" feature turned on, to have
the background of the image not be visible when shown on a Web page.
The Frame box is used to select the color or pattern used
for the frame of shapes drawn by the Shape tool and by the Frame command.
It's also used as the shadow color by the Drop Shadow command.
The Fill box is used to select the color used to fill the
inside of shapes drawn with the shape tool. It's also the color used when
drawing with the Brush, Pencil, Line, Paint Bucket, Text or Air Brush tools.

The Mouse Coordinates Palette shows you
information about the location of the mouse cursor. If you are using the
EyeDropper tool, the "RGB" area of Mouse Coordinates tool will
show you the Red-Green-Blue values of any pixel or color you click on. You
can also use it to draw shapes or lines of a certain size or angle or to
measure areas to be cut out using the selection tools.
The two pop-up menus in the Mouse Coordinates palette let you choose the
units used to display the information. For measurements, you can choose
inches, pixels, centimeters, picas, and points. Pixels are probably the
most useful measurement units for Web page creation. The RGB values can
be displayed as decimal, percentage or hexadecimal. Using the hexadecimal
setting can be handy when trying to match text or background colors in your
Web page with colors in your image -- RGB colors for the text or background
in HTML documents are given in hexadecimal.

The Paint Controls palette lets you set the opacity
of the paint used when you draw with the drawing tools or paste in an image.
This is normally set to 100% so that images you draw or paste totally replace
what you draw or paste over. However, if you wish part of the background
to "show through", you can adjust the Opacity slider so that the
paint or pasted image is partially transparent. This is good for special
effects, "watermarks", etc.
There are also some controls and information in each wwwART document window
that can be useful to you when creating graphics for Web pages.

At the top of each wwwART window is an "information bar". This
tells you (left to right) how big your image is in bytes, K (kilobytes),
or M (megabytes) and is useful information when designing Web graphics -
the smaller the size, the less transmission time it will take. In the above
example, the image is 156 Kilobytes in size, 400x400 pixels in width and
height, and is a 256 Indexed Colors format. Note, however, that this is
the uncompressed size of the image. Both GIF and JPEG images are
compressed when saved, and it's the compressed form that's transmitted over
the Internet when you view a Web page. You can see the compressed size of
the image and how long it will take to transmit at various baud rates by
saving it, then picking Image->Get Info.
The dimensions of the image are initially shown in pixels, but you can change
this by clicking and holding down the mouse button on top of the area where
the dimensions are displayed (where it says "400x400" above. A
pop-up menu will appear to let you select another unit of measure. You can
also change the unit of measure using the pop-up menu in the Mouse Coordinates
Palette. Pixels is the most useful unit for Web page creation, however.
You can use the data displayed in the information bar directly in an HTML
<IMG> tag to specify the width and height of an image. Doing so allows
Web Browsers to layout and start to display the text of a Web page properly
before the image has actually been downloaded. For example, using the information
shown in the above information bar (400 x 400 pixels) you could create an
IMG tag like this:
TIP: If you use a text-based Web page editor, the Edit->HTML Tag to Clipboard menu command will place a properly formatted HTML <IMG> tag on the clipboard (with the filename, width and height of your document already filled in), ready to be pasted into the text of your HTML document. Here's what using that menu command would place on the clipboard for a document with the dimensions shown above and a file named "cyberfrog.gif":
You may need to edit the SRC= part to specify the folder
(directory) your image is stored in on the Web server. You may also want
to edit the text after ALT=. This "Alternate"
text is displayed by some browsers while the image is loading, or if you've
got image loading turned off to speed up web browsing. Think of it as a
"caption" for your image when specifying the text. It's not required,
so you can remove the ALT="..." text completely if you wish. You
can also adjust or remove the ALIGN= or BORDER= items if you desire.
Finally, the number of colors in the image is shown on the right hand side
of the information bar. Generally, GIF images are 256 colors, and JPEG images
are Millions (shown as "RGB" instead of "Millions" by
wwwART).
![]() At the bottom left corner of wwwART document windows are
3 controls that let you zoom in and out on your image so you can edit it
in finer detail, or "see the big picture". These controls are
documented in the Reference section of the wwwART manual.
At the bottom left corner of wwwART document windows are
3 controls that let you zoom in and out on your image so you can edit it
in finer detail, or "see the big picture". These controls are
documented in the Reference section of the wwwART manual.
There are many ways to use wwwART to create or edit images for your web
pages. You can....
Create a new image with the File->New command and use
the drawing tools to draw it
Use the File->Open command, or double-click a document
icon to open an existing image (wwwART can open many file formats, not just
GIF and JPEG)
Drag-and-drop a picture document (in any format we support,
regardless of what program created it)


onto the wwwART program icon:![]()
We support opening documents that are in the following formats: JPEG,
GIF, some TIFF, Macintosh PICT, Photoshop 2.0 and 2.5, Kodak PhotoCD, some
PostScript (EPSF), Paint, StartupScreen, Photone Prepress, and Scitex CT.
These are the same file formats supported by wwwART's more powerful cousin,
Color It!
We support saving documents in GIF and JPEG format, the only two formats
in general use on World Wide Web pages.
 Additionally, you can drag images out of a wwwART window
to the desktop to create picture clippings (and vice versa) and to the windows
of other programs that support drag and drop, such as many WYSIWYG web page
creation programs such as PageMill or Claris Home Page, some other graphics
programs, or to desk accessories such as the Scrapbook, and Jigsaw Puzzle
or control panels such as Desktop Patterns, and Map.
Cut and paste images from other programs into wwwART's window.
Scan a picture using the File->Scan/Import menu item
if you have an image scanner. Most Photoshop Acquire plug-ins will work
with wwwART (these include scanner and camera plug-ins, as well as file
or other device acquire plug-ins).
Once you have opened or drawn or scanned an image, you may need to:
![]()
![]()
![]() "Crop"
it to remove parts you don't want (using the Selection tools and the Image->Crop
to Selection command , the Image->Canvas Size
menu commands, etc.)
"Crop"
it to remove parts you don't want (using the Selection tools and the Image->Crop
to Selection command , the Image->Canvas Size
menu commands, etc.)

Retouch it (using the drawing tools, "filters" such as Filter->Adjustment->Auto
Contrast , flip & rotate the image using Image->Flip->
and Image->Rotate-> menus, etc.)
Apply "special effects" using:
- Other filters on the Filter menu
- drop shadow and extrude commands (on the Selection Menu)
- fill, frame, border, smooth edges, and other commands (on the Edit and
Selection menus)
- Distortion effects (on the Image->Effects menu)
Here's an example of opening and working with an image. We'll open a JPEG
file containing a copy of the wwwART Frog logo, select the frog, give it
a drop shadow, and save it as a "transparent" GIF so that the
background is invisible when the image is displayed in a web page.
Open the "wwwART Tutorial " folder![]() that was installed
in the same folder as the wwwART program and locate the "CyberFrog
" document.
that was installed
in the same folder as the wwwART program and locate the "CyberFrog
" document.
Drag and drop the "CyberFrog" document icon  on top of the
"wwwART" program icon
on top of the
"wwwART" program icon![]() (or just double-click
the "CyberFrog" document.
(or just double-click
the "CyberFrog" document.
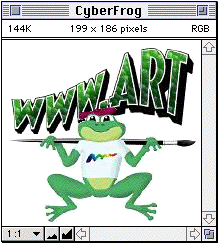
The image will open.
In the Tools Palette, select the "Magic Wand" tool:
![]()
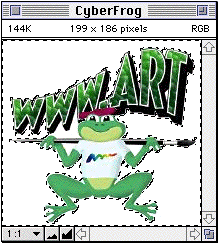
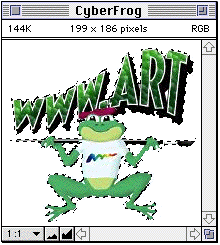
With the Magic Wand tool still selected, hold down the SHIFT key on the
keyboard and click on the other white "background" areas such
as those between the frog's arms and the paint brush he's holding, until
the entire background is selected.
Pick Selection->Invert Selection . This "swaps"
the area that's selected for the area that isn't, so now the frog and the
"wwwART" text should be selected, instead of the background.
Let's put a "drop shadow" behind the image. Pick Selection->Drop
Shadow . Drag the gray box behind the black box to indicate where
you want the shadow to appear on the actual image. Set the other settings
as shown below:
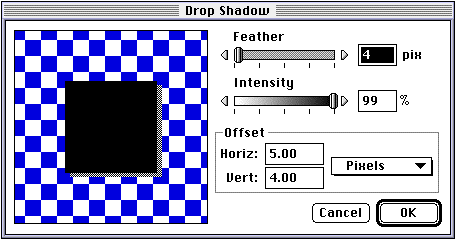
Click OK to make the drop shadow.
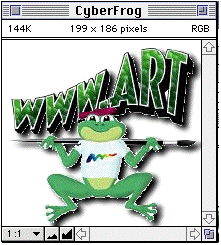
Pick Selection->Select None (or type Command-D) to
get rid of the selection marquee so you can see the image.
You'll notice that around the edges of the frog and logo there are some
ugly whitish pixels. This is because the edges of the original image were
not quite "sharp"; in the original image there were some not-quite-white
pixels on the edges so that there would be a subtle shading effect between
the pure white of the background and the image. This will occur in images
from time to time. To get rid of these not-quite-white pixels we're going
to undo the drop shadow, then "feather" the edges of the selection
inward by one pixel to get rid of most of those whitish pixels. Do the following:
Pick Edit->Undo and then pick Edit->Undo again .
The drop shadow should disappear, and then the image should be re-selected.
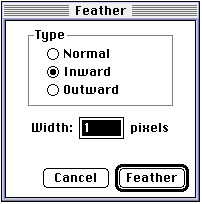
Pick Selection->Feather . Select "Inward",
and give it a width of "1" pixel, then click OK
. The selection will be feathered (although visually you won't see any real
change).
Pick Selection->Drop Shadow again and use the setting
from our last attempt (they should still be there - all you need to do is
click OK ).
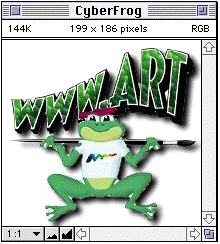
Pick Selection->Select None to get rid of the selection
marquee so you can see the image.
The whitish border of pixels should no longer be around the edges of the
frog, although there are still a few not-quite-white areas between the frog's
fingers and in the crook of the frog's legs. If you like, you can use "undo"
a couple of times and go back and make sure those areas are selected too,
before you "invert selection". This is left as an exercise for
the reader, however. (Hint: use the Magic Wand tool while holding down the
SHIFT key to click on the "not quite white" pixels. You will probably
also need to zoom in using the Magnifier tool or the zoom controls at the
bottom left corner of the window to make it easier to select those pixels)
We want to save this image (which is initially a JPEG) as a GIF, since
JPEG images can not have "transparent" background pixels. JPEG
images must be in Millions, but GIF images must be in 256 colors, so let's
convert the image to 256 Indexed Colors.
Saving an image in GIF format is best for images that don't have too many
colors, such as charts or cartoon characters or logos. However, photographs,
or even images with a lot of shades of particular colors, should generally
be saved as JPEG images.
WARNING: JPEG images use a "lossy" compression.
Each time you save it, you may lose a little image quality. So don't save
and re-save a JPEG image constantly. You should probably save a copy of
the original image, under a different name and work on the copy so you'll
always have the original to fall back on.
Pick Image->Image Type->256 Indexed Colors
A dialog box like this will appear:
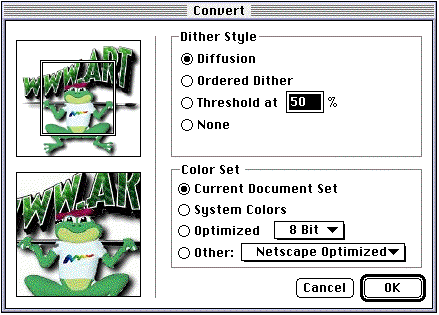
This dialog will help you convert a Millions of colors image to a 256
color image. Dithering and various color sets are available to be used in
the conversion to help you adjust the image to make it look as good as possible
after the conversion, because when you are converting from Millions of Colors
(over 16 million, in fact) to 256 colors, you are obviously reducing the
number of possible colors your image can contain drastically. Some images
are more difficult to convert than others. Such images (usually photographs,
or images with many shades of the same color) may have to be saved as a
JPEG in millions of colors. You may not be able to make such images "transparent
GIFs" without using dithering and perhaps some cleanup work. You'll
have to determine which is best for your needs through experimentation and
experience.
It's also important to remember that not everyone has a computer that can
display millions of colors.....while most Macintoshes support thousands
or millions of colors, many (perhaps most) MS-Windows computers have only
256 colors.
If possible, try to use a Color Set setting of "Other: Netscape
Optimized" for best compatibility with both MS-Windows and Macintosh
web browsers. The "Netscape Optimized" color set is designed to
contain the 216 (not 256!) colors that both Macintosh and MS-Windows have
in common when their monitors are set to 256 colors (the most common setting
on both Macs and Windows machines).
If you don't use these, it's possible that the image may appear slightly
different on different types of computers, due to the different color sets
used on the different computer systems. Converting using the Netscape color
set may also cause some of the colors in your image to shift to different
values and your image may not look as good, but at least you'll know this
now, rather than finding out about it later. You'll have to decide which
Dither and Color Set settings are best for your needs through some experimentation.
For best results on all computers, use 256 color GIF images, dithered if
necessary, and use the Netscape Optimized color set, adjusting your image
to compensate for color shifts as necessary.
Some other good choices to try are a Color Set of "Current Document
Set" or "Optimized Colors". Experiment a bit with dithering,
as well. Use the before and after images to see how your image will look
when converted. If you have access to an MS-Windows machine, or some other
type of computer that has a Web Browser available on it, be sure to examine
your graphics to see if they look good on all platforms.
The "Optimized" color setting has a pop-up menu that will let
you see how your image will look at various color depths below 8 bit (256
color).
Once you've decided on Dither Style and Color Set conversion settings, click
OK to convert the image to 256 Indexed Colors.
Now that we've converted the image to 256 colors, we can save it as a GIF
image and make the background transparent:
Select the EyeDropper tool : ![]()
Click on the "Back" box in the Colors Palette so that it's highlighted:
 After (highlighted):
Point in the image and click with the EyeDropper somewhere on the white
background. This will cause the EyeDropper tool to "pick up" the
white color you clicked on and make it the document's "background color".
This color will be marked as the "transparent pixel" color when
you save a GIF with the "Make Background transparent" option turned
on.
Pick File->Save as . Type "cyberfrog.gif
" as the file name (you should always save GIF images with a ".gif"
at the end of the name. It's also best to keep the name all lowercase letters
and numbers and use no spaces or other punctuation except for the dash (-)
or underscore (_) characters. This makes certain that the file name will
be acceptable for non-Macintosh web servers.
Click the "Options" button.
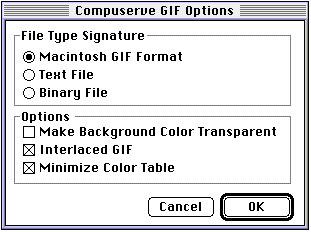
Select "Macintosh GIF " and put a check mark
in the "Make Background transparent " checkbox.
While we're here, let's discuss the other GIF options:
The two other File Type Signature settings (Binary
and Text ) are useful if you are saving the GIF image directly
over a network to the hard disk of the web server and the web server is
NOT a Macintosh. This makes sure that the file is in the proper format for
being saved on a non-Macintosh web server.
The "Interlaced GIF " option is useful with larger
images; it will cause web browsers that support Interlaced GIF images to
draw the image in "bands" that start out with a "coarse"
outline of the image and the bands get successively "finer", revealing
more and more detail. This is useful because it lets the person browsing
your web page get an idea what the image is about before it's fully downloaded.
If they decide they not interested in the image, based on the coarser views
of it, they can move to another web page before it's finished downloading
the image.
The "Minimize Color Table " option, if checked,
will examine the colors used by the image and save the image with a color
table as small as possible and with a bit depth less than 8 bits (256 colors)
if possible. This can greatly reduce the size of an image. We normally suggest
you turn this on only when you are done editing the image and are saving
it for the last time, as it will cause any colors in the document's color
table to be reduced to just those colors actually in the image (you can
see a document's current color set in the Colors Palette by selecting the
Grid palette and picking "Document Color Set" from the pop-up
menu above the grid.) If you're still editing an image, loss of the other
color possibilities can make further editing more difficult. You may want
to save an "original" copy of the GIF without turning
on the "Minimize Color Table" function before saving it with minimize
on. That way you have something to fall back on if you decide you need to
edit it again later.
Click OK , then click the Save button
to save the image as "cyberfrog.gif". The image will be saved
in GIF format. If this were an image you were actually going to use on your
web page, be sure to save it where you normally keep such images (most web
sites seem to have an "images" folder in the same folder as their
HTML files where images used on the site are stored, but this is not a requirement).
Several of the settings we just talked about are oriented towards saving
the users time, either by a coarse view of the image before it's fully downloaded
or reducing the size of the image. If you want to see how long an image
will take to download at various baud rates, pick "Get Info" from
the "Image" menu.
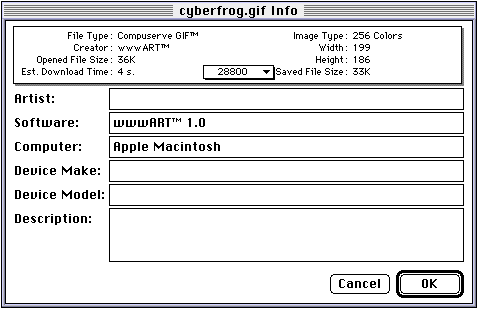
The download time will be displayed (based on the saved file size, as
we explained earlier), along with a pop-up menu you can use to change the
baud rate used to calculate the download time at various speeds (the initial
setting is 28,800 baud, the most popular modem speed in use today). Note
that you must have saved the image before you can get an accurate reading
on the download time.
To see what this image will look like in your browser, drag and drop the
"cyberfrog.gif" document icon onto your Web Browser's application
icon (most Web Browsers will open and display GIF or JPEG images dropped
onto their application icon)
TIP: Some browsers, such as Netscape Navigator, have preference
settings that let you set the default background color or pattern so you
can see what your image will look like on whatever color or pattern you
want to use.
Now that you've saved it, you can use the "cyberfrog.gif" image
on a web page. Most "WYSIWYG" Web Page creation programs such
as PageMill, Claris Home Page, etc, allow you to drag and drop a document
icon straight into their opened window.
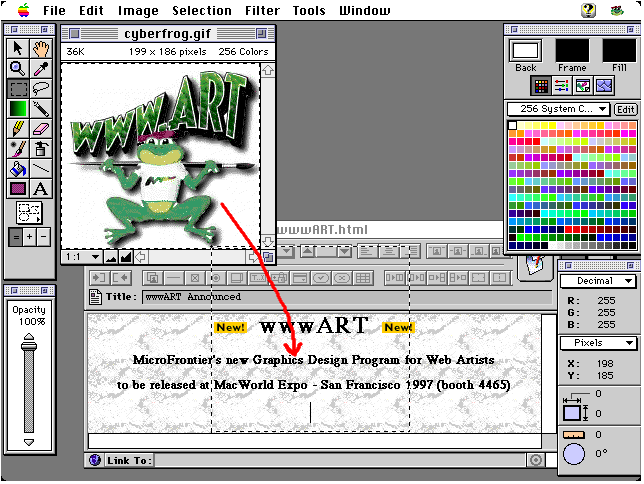
Most Web Page creation programs also allow you to drag a selected
picture directly from the WINDOW of some other program that support drag-and-drop.
wwwART is such a program. Here's how you drag and drop an image from a wwwART
window into a Web page creation program's window, for instance (we'll use
PageMill, in this example):
Open your Web Page creation program and the web page you want to add an
image to.
Open wwwART and the document containing the image you want to add to the
web page.
Select some or all of your image using the selection tools ![]()
![]()
![]() in the Tool palette.
If you want to do the whole picture, pick Selection->Select All
from the menu bar.
in the Tool palette.
If you want to do the whole picture, pick Selection->Select All
from the menu bar.
Select the Hand tool ![]() or one of the selection tools
or one of the selection tools ![]()
![]()
![]() and then click in the selected
part of the wwwART document. Keep the mouse button held down and drag the
image out of the wwwART window over on top of the window containing the
Web Page you wish to place the image in. An example of this is show below.
You'll need to be able to see the spot in the web page window where you
want to place the image.
and then click in the selected
part of the wwwART document. Keep the mouse button held down and drag the
image out of the wwwART window over on top of the window containing the
Web Page you wish to place the image in. An example of this is show below.
You'll need to be able to see the spot in the web page window where you
want to place the image.
TIP : When you drag and drop an image from a wwwART window or a
desktop clipping into a Web Page creation program, a COPY is made of the
image, and the new image is given a name such as "image1.gif",
"image2.gif", etc. Your original document is typically not
used by the web page creation program. If you want to use the original .gif
or .jpg document name on the web site, then you'll typically need to place
your ".gif" or ".jpg" document in the standard folder
used by the web site to store images and then drag and drop the .gif or
.jpg document icon from the Finder window into the web page creation
program's window. Consult your web page creation program's documentation
for details.
NOTE: If you open a GIF image that was saved in transparent
form with wwwART and then drag-and-drop part of the image from the wwwART
window into your web page creation program's window, the web page creation
program will not know that you're dragging an image from a transparent GIF.
You'll have to use the web page creation program's tools to make the dragged
image's background transparent again.
Other things you can do with drag-and-drop
You can drag images from one wwwART window to another.
You can drag images from a wwwART window to another program that supports
drag-and-drop, such as the Scrapbook or Jigsaw Puzzle desk accessory, the
Desktop Patterns Control Panel, etc. You can also drag images from those
programs INTO a wwwART window.
 You can drag images from the wwwART window to the desktop
to create a desktop clipping file, or vice versa.
This concludes our brief tutorial on using wwwART to create Web page graphics.
Be sure to read the Reference Manual completely for details of each tool
and menu command available in wwwART. Remember to check the "Tips Library" section
on the MicroFrontier web site occasionally for tips on using wwwART and
other MicroFrontier products more effectively. Our web site can be found
at: