The Image menu contains commands that allow you to convert image types, change the scale or size of a document, or rotate, stretch, skew, distort, or apply perspective to a selection or the entire document.
The Image Type command lets you change the color or gray levels of a document. The current image type is shown with a check mark in the menu.
When you convert to fewer color or gray levels, the Convert dialog box opens.
The top preview shows the entire document. Click and drag the rectangle to select the area of the image shown below that shows the effect of the various conversion methods.
The Dither Style area offers radio buttons with several different styles: Diffusion, Ordered Dither, Threshold or None.
Threshold converts the image to a posterized image consisting of pure backs and whites. The percent entered in the textbox determines the level at which the black-to-white change takes place.
None does not dither the image when converting.
The Color Set area lets you choose one of several color sets to be used when printing the document. The Optimized button has a pop-up that lets you choose the bit depth and preview the effect before actually converting (reducing the bit depth make smaller file sizes).
The Other pop-up lets you select from any sets installed in the Color Sets folder inside the wwwART Stuff folder. The Netscape Optimized color set contains the 216 colors common to both the Mac and Windows version of Netscape and will not dither when viewed on either platform.
The Scale command opens a dialog where the width and height may be changed by entering new numbers for either in the Scaling (percent) or New textboxes. Unchecking Keep Aspect Ratio enables the width or height to be changed independently.
The Units pop-up menu lets you change measurements to pixels, inches, centimeters, picas or points.
Checking Smooth Scaling improves the appearance of images which are scaled 2 or more times their original size. Normally the image appears more pixilated or blocky as you increase the magnification, but the transitions are smoother with this option chosen.
The Reset button returns the values in the Scaling boxes to their original settings.
The Canvas Size command lets you change the size or add extra space to a document without changing the size of the existing image. Enter numbers in the Width and Height textboxes for the new document dimensions (Unchecking Keep Aspect Ratio enables width and height to be changed independently).
The Align pop-ups let you position the present image within the area defined by the new document dimensions.
The Units pop-up lets you change measurement units.
The Reset button returns the values in the Width and Height and to their original settings.
The Crop to Selection command deletes any of the image outside of the current selection. Only the portion of the image within the selection is left as the entire image.
The Grow to Selection command is only available when part of the active selection is moved beyond the edges of the document. Grow to Selection increases the canvas area of the document enough to include the active selection. The additional area is filled with white. This is useful when pasting an image larger than the current document.
The Flip commands let you flip the active selection or entire document.
Flip Horizontal flips the active selection horizontally.
Flip Vertical flips the active selectionvertically.
The Rotate command displays a menu with several commands for rotating the image for a document or selection.
The Arbitrary command opens a dialog box that lets you rotate the selection or the entire document in 0.01 degree increments. Rotate in a right (clockwise) or left (counterclockwise) direction by choosing the appropriate radio button.
The Free Rotate command lets you rotate a selection by hand. wwwART places grow handles at the four corners of the selection. Click on one of the handles and drag to rotate the selection.
The Rotate 90 degrees Right (CW) command rotates the active selection (or the entire image if there is no active selection) 90 degrees to the right (in a clockwise direction).
The Rotate 90 degrees Left (CCW) command rotates the active selection (or the entire image if there is no active selection) 90 degrees to the left (in a counter-clockwise direction).
NOTE: Neither the Rotate 90 degrees Right (CW) nor Rotate 90 degrees Left (CCW) commands crop the image when it is rotated.
The Rotate 180 degrees command rotates the active selection (or the entire image if there is no active selection) 180 degrees.
The Effect command displays a menu with several commands for modifying a document or selection.
The Stretch/Shrink command lets you interactively scale an image. When you choose the command, wwwART places grow handles at the four corners of the selection. Click and drag one of the handles to stretch or shrink the selection. Holding down the [Shift] key while dragging retains the image's proportions.
The Skew command lets you slant the active selection along either the horizontal or vertical axis. When you choose the command, wwwART places grow handles at the four corners of the selection. Click and drag one of the handles to skew the selection.
The Perspective command lets you change the perspective of the active selection. When you choose the command, wwwART places grow handles at the four corners of the selection. Click and drag one of the handles to create either a horizontal or vertical perspective of the selection.
The Distort command lets you create a number of special effects. You can perform successive distortions on a selection without causing any degradation to the image. When you choose the command, wwwART places grow handles at the four corners of the selection. Click and drag one of the handles to to distort the image.
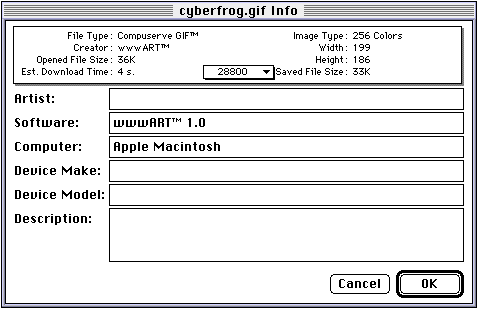
The Get Info... dialog box displays important details about the document. The top area lists some basic information:
File Type shows the document's file format.
Image Type lists the number of colors in the document.
Creator shows the name (or creator identity) of the program which created the document.
Width is the size of the document in pixels.
Opened File Size is the amount of space the document occupies in kilobytes (k) when open.
Height is the size of the document in pixels.
The Estimated Download Time shows the approximate time needed in minutes and seconds to transmit the file at various speeds. The pop-up lets you choose from a range of standard baud rates.
The Saved File Size shows the size of the file when stored on a disk. This may differ from the Opened File Size because documents on disk may be compressed.
Information can be entered in the textboxes below that are saved with the document:
Artist: The name of the person who created the document.
Software: The creator program ("wwwART" by default, but it may be changed.)
Computer: The type of computer used to create the document. ("Apple Macintosh" by default but it may be changed.)
Device Make: The hardware used to create the document.
Device Model: Specific model information.
Description: Notes or other comments about the document.