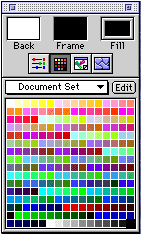
 The Colors palette is used to select and
edit colors and patterns. It can be opened from the Tools menu [Command-Y]
or by double-clicking the Eyedropper tool.
 The Colors palette is used to select and
edit colors and patterns. It can be opened from the Tools menu [Command-Y]
or by double-clicking the Eyedropper tool.
The Back box indicates the color or pattern used for the background color. This fills holes created when selections are moved, cleared or cut. The Frame box indicates the color or pattern chosen for frames. The Fill box indicates the color or pattern used in painting and fill operations. Clicking in one of the boxes selects it. The selected color type is shown with a gray border.
Four different displays are available for the bottom portion of the Colors palette: Color Grid, Sliders, Scratch Pad, and Patterns.
The Color Grid displays colors that may be chosen by clicking on a color square. The number of colors displayed depends on the type of document open. A grid of 256 colors appears for documents with 256 colors to millions of colors (see above); while documents with 16 or fewer colors will display a grid of 16 colors. Grayscale documents with 256 levels show a grid of 256 grays; documents with 16 or fewer grays display a grid of 16 gray levels. The pop-up menu gives you a choice of different color palettes. Specialized color sets or those you create or modify appear at the bottom of the list.
NOTE: The Netscape Optimized color set contains the 216 colors common to both the Mac and Windows versions of Netscape that do not dither.This set is courtesy of MicroFrontier customer Cameron T. Murray.
Clicking the Edit button brings up a dialog box where color sets are edited or created. Clicking on the Color Set pop-up at the upper left lets you choose from existing sets or create a new color set.
Selecting New Set opens a dialog box where you enter the name of the new set. The Color Set Size pop-up lets you choose the number of colors in the set (16, 36, 64 or 256). Clicking OK saves the new set in the Color Sets folder inside the wwwART Stuff folder (inside the wwwART folder on your hard drive). New sets are grayscale until edited.
Color squares are selected by clicking on them. Clicking the Copy button copies the selected color squares. The squares may be pasted into other squares by clicking on the squares and clicking the Paste button. Clicking the Clear button changes selected color squares to black. The Undo/Redo button is a toggle that lets you reverse the last action taken for selected squares. The Pick button opens the standard Apple color picker, where a color can be selected by clicking within the color wheel, moving sliders, or entering values in the text boxes.
A range of squares can be selected by clicking and dragging. The Blend button changes the selected color squares to a blend between the first and last squares selected.
The Sort button opens a dialog box that lets you choose methods of sorting the colors in the set. The Primary and Secondary pop-up menus offer several choices for sort methods.
The Reverse button swaps the order of the selected color squares (upper left corner to lower right corner).
The Warm, Cool, Light and Dark buttons change the selected colors by changing their color values. Clicking the button again repeats the operation on the newly-changed color.
The Tint button opens a dialog box where a value from -20 to 20 can be entered. The starting color square is tinted by the value entered in the next square, and repeated to the ending square (for 5%, the second square is 5% lighter, the next 10% lighter, etc.) Positive ranges lighten the selected colors; negative values darken the selected colors.
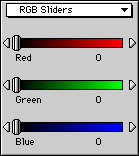
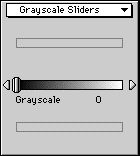
Sliders displays controls to change the selected color. The pop-up lets you choose between RGB and Grayscale sliders. The sliders are adjusted by clicking and dragging on the button. Clicking on the pointers at each end changes the settings one unit at a time. Changes made are reflected in the selected color box (Back, Frame or Fill) at the top of the palette.
 Scratch Pad
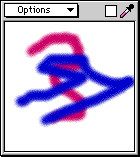
The Scratch Pad allows you to experiment with wwwART's brush tools, test changes to a portion of the image without changing the original image, and store a range of colors for use on the original.
The commands in the Options pop-up menu let you import images into the Scratch Pad.
The Grab From Image command lets you grab a portion of the document and place it on the Scratch Pad. When you select the command, a dialog box appears where you can select a portion of your document to copy to the Scratch Pad.
To make a new selection, move the cursor over the selection rectangle, then click and drag the rectangle to select a different portion of the document. For finer control, move the cursor over the box on the left, then click and drag to nudge the selection. Once you have selected a new area, click the Grab button.
The Paste From Clipboard command pastes the clipboard contents into the Scratch Pad. Clipboard images are scaled to fit.
The Clear command deletes the contents of the Scratch Pad.
The Save command saves the contents of the Scratch Pad.
The Revert command undoes any changes made to the Scratch Pad.
Clicking the Eyedropper checkbox turns tools moved over the Scratch Pad into the Eyedropper tool. Clicking on the Scratch Pad then selects the color at the point selected.
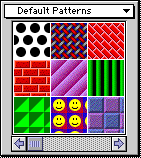 Patterns
Pattern fills can be used like any other fill with selections, as paint for brushes, etc. wwwART comes with a number of patterns. New pattern sets can be purchased from MicroFrontier, or created in the Color It! application.
The Pattern Set pop-up lets you choose from the patterns and sets stored in the Pattern Sets folder in the wwwART Stuff folder.
Select a pattern by clicking on the sample square. The selected pattern has a grey frame around it, and the pattern appears in the selected color square at the top of the Colors palette. The scroll bar and scroll arrows at the bottom of the palette can be used to make more of the patterns in the set visible.
The pattern can be used as a fill or as paint for a brush. Any attributes that can be applied to a brush such as style, size and opacity may be used.