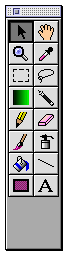
 The Tools palette is a floating palette that contains
tools that let you view, select and modify documents.
The Tools palette is a floating palette that contains
tools that let you view, select and modify documents.
The Tools palette is a floating palette that contains
tools that let you view, select and modify documents.
The palette is closed by clicking the close box in the top left corner. The Tools command in the Tools menu [Command-T] is a toggle which opens and closes the palette. Move the Tools palette by clicking on the title bar and dragging it to a new position. The Antialiasing command in the Tools menu is a toggle which turns antialiasing on and off for many tools.
Modifier Tool Shortcuts
Several shortcuts are available by using modifier keys. Unless otherwise
noted under the review for an individual tool, the following are common
for all tools:
[Shift]: constrains the action of the tool to horizontal or vertical
movement.
[Option]: changes to the Eyedropper tool.
[Spacebar]: changes to the Mover tool.
[Spacebar-Command]: changes to an enlarging Magnify
tool.
[Spacebar-Command-Option]: changes to a reducing Magnify
tool.
Note that many tools have pop-ups that appear at the bottom of the Tools palette when a tool is selected. The pop-ups vary with the tool chosen.


The Pointer tool lets you move a selection without moving its contents. Clicking outside of a selection with the Pointer does not deactivate the selection; rather it repositions the selection centered on the mouse click.
Double-clicking the Pointer tool opens or closes
the Mouse Coordinates palette.
The Mover tool lets you scroll the document when it is too large to fit in the active window. An active selection is picked up and moved like a floating paste; it does not affect the background until deselected.
The three icons at the bottom of the palette control
how the document is displayed. The top left icon is Normal Window
mode which displays all the standard Macintosh window elements as well as
wwwART's magnification pop-up and buttons.
The top right icon is Full Screen mode. The document fills the entire screen (except the menu bar) if the view is large enough. If the view of the document is not large enough, a gray background fills the rest of the screen. The bottom icon is No Menubar mode, similar to the Full Screen mode except the menu bar is hidden as well. Although hidden, the menu bar will appear when the mouse button is held down as you click in the menu bar area at the top of the screen.
(See Chapter 11, The Window Menu for more information on these modes).
Double-clicking on the Mover zooms the window to fill the screen and resizes the document view to Fit. Double-clicking again changes the view to 1:1.
The Magnify tool lets you reduce or enlarge your view of the document.
Clicking and dragging the Magnify tool over a region fills the window with that region when the mouse button is released.
[Command] + Magnify tool sets the document view to 1x magnification and centers the click point in the window.
[Option] + Magnify tool sets it to reduction mode.
![]() The Eyedropper tool lets
you pick up a color from the document. When you select it, a color bar and
an area selector pop-up is added to the bottom of the Tools palette.
The Eyedropper tool lets
you pick up a color from the document. When you select it, a color bar and
an area selector pop-up is added to the bottom of the Tools palette.
![]() Clicking in the document fills the bar with the
color at the point clicked.
Clicking in the document fills the bar with the
color at the point clicked.
![]() Clicking and dragging fills the bar with a gradient
blending from the color where you first clicked to the color where you released
the mouse. The most recent color becomes the foreground, background or frame
color depending upon the color region currently selected.
Clicking and dragging fills the bar with a gradient
blending from the color where you first clicked to the color where you released
the mouse. The most recent color becomes the foreground, background or frame
color depending upon the color region currently selected.
Holding the [Option] key while clicking sets the starting color; holding the [Command] key sets the ending color.
Clicking the Eyedropper inside the color bar selects a specific color.
 Clicking on the pop-up at the bottom of the
Tools palette
Clicking on the pop-up at the bottom of the
Tools palette
changes the size of the sample area the Eyedropper uses.
The color value selected is the average of the pixels in the area chosen.
Double-clicking on the Eyedropper displays or hides the Colors palette.
[Shift + Option] + Eyedropper changes to the Mover tool.
The Shape Selection tool selects an area of a document. The pop-up at the bottom of the palette permits selecting from rectangular, oval, round rectangular or polygon shapes by clicking and holding on the pop-up and moving the cursor over the shape and releasing the mouse. The chosen shape then appears in the Tools palette.
![]() At the bottom of the palette, the Selection
Calculator Equals button lets you make a new selection. The Plus
button ( or [Shift]) adds and the Minus button ( or [Command])
subtracts from the current selection. Selecting with [Command-Shift]
selects the intersection of the two selections.
At the bottom of the palette, the Selection
Calculator Equals button lets you make a new selection. The Plus
button ( or [Shift]) adds and the Minus button ( or [Command])
subtracts from the current selection. Selecting with [Command-Shift]
selects the intersection of the two selections.
Pressing an [arrow] key nudges the selection 1 pixel at a time. [Shift-arrow] nudges the selection 10 pixels.
The Lasso tool lets you make a tight selection around an irregularly shaped object.
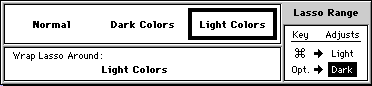
![]() wwwART defaults to Normal. Clicking on the Lasso
Range pop-up lets you select from several modes
wwwART defaults to Normal. Clicking on the Lasso
Range pop-up lets you select from several modes
In Normal mode, the Lasso will grab the entire
contents of your selection. Dark Colors mode selects only darker
colors; Light Colors selects only lighter colors.
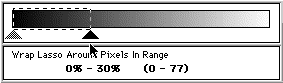
Modifier keys permit precise control over the range of grays selected. The [Option] or [Command] keys change the display to a graduated bar. Dragging the mouse over the bar selects all values from black to that point with the [Option] key or from white to that point with the [Command] key. As you move the mouse, a pointer moves along the bar with a selection box indicating the colors chosen.
The Wrap Lasso Around Pixels in Range box displays the percentage and color values for the range selected. Release the mouse button when the range you wish is selected, and the Lasso will only select colors in that range.

The Selection Calculator features are the same as described for the Shape Selection tool earlier in this chapter.
Double-clicking on the Lasso tool toggles between Select All and Select None. Pressing an [arrow] key nudges the selection 1 pixel at a time. [Shift-arrow] nudges the selection 10 pixels.
![]() The Gradient tool lets you
create a gradient between any two colors. When you select the Gradient
tool, a gradient color bar is added to the bottom of the Tools
palette.
The Gradient tool lets you
create a gradient between any two colors. When you select the Gradient
tool, a gradient color bar is added to the bottom of the Tools
palette.
The colors used in the color bar are chosen with the Eyedropper tool from either the document or the color grid. The gradient wwwART creates exactly matches the gradient bar at the bottom of the Tools palette. When you move the crosshair over the active window, two parallel lines show where wwwART will create the gradient. The line that appears on the side of the crosshair where you start is the beginning point of the gradient and the opposite line is the ending point.
[Shift] + Gradient constrains the gradients to horizontal, vertical, or 45 degree angle gradients.
Note: Gradients will appear best in documents that are a Millions of RGB Colors Image Type. See Chapter 7, The Image Menu for more information.
The Magic Wand tool is a very powerful and flexible selection tool. A single click on a document selects a contiguous color area. Dragging the Magic Wand reads all of the colors it passes through and selects any contiguous areas containing that range of colors.
![]()
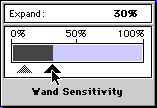 Selecting the Magic
Wand tool adds a Wand Sensitivity pop-up menu to the bottom
left of the Tools palette that controls how many colors are selected
when you click or drag the tool on a document (for example, clicking on
a color with a 10% sensitivity selects all colors within 5% on each side
of the selected color). Low sensitivity expands the selected range of colors
only a few levels; higher sensitivity adds more levels to those chosen with
the tool. As you change the sensitivity, a black pointer shows the current
level and a gray pointer the previous level.
Selecting the Magic
Wand tool adds a Wand Sensitivity pop-up menu to the bottom
left of the Tools palette that controls how many colors are selected
when you click or drag the tool on a document (for example, clicking on
a color with a 10% sensitivity selects all colors within 5% on each side
of the selected color). Low sensitivity expands the selected range of colors
only a few levels; higher sensitivity adds more levels to those chosen with
the tool. As you change the sensitivity, a black pointer shows the current
level and a gray pointer the previous level.
The Selection Calculator features are the same as described for the Shape Selection tool earlier in this chapter.
Double-clicking on the Magic Wand toggles between Select All and Select None.
The Pencil tool changes selected pixels to the foreground color.
![]() Two features appear at the bottom of the Tools palette
when the Pencil is selected. The top feature lets you
select either a square or round shape. The current shape has an outline
around it.
Two features appear at the bottom of the Tools palette
when the Pencil is selected. The top feature lets you
select either a square or round shape. The current shape has an outline
around it.
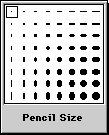 The pop-up menu below lets you select a size for the
Pencil. The current size has an outline around it. The
Pencil Size dialog box lets you select a size for the tool by moving
the cursor over the shape you wish.
The pop-up menu below lets you select a size for the
Pencil. The current size has an outline around it. The
Pencil Size dialog box lets you select a size for the tool by moving
the cursor over the shape you wish.
Double-clicking on the Pencil tool toggles between 1x and 8x views of the document. The 8x magnification makes pixel editing with the Pencil easier.
NOTE: When not in a 1:1 (100%) image view, Choose Tools->Cursor-> Brush Size to give you a view of the area to be affected by the Pencil.
The Eraser tool wipes away the image leaving only the background color.
 Two features appear at the bottom of the Tools palette
when the Eraser is selected. The top feature selects
a square or round shape. The current shape has an outline around it.
Two features appear at the bottom of the Tools palette
when the Eraser is selected. The top feature selects
a square or round shape. The current shape has an outline around it.
The pop-up menu below lets you select a size for the Eraser. The current size has an outline around it. Select the size from the Eraser Size pop-up by moving the cursor over the shape you wish.
Double-clicking the Eraser erases the entire document, leaving only the background color.
NOTE: When not in a 1:1 (100%) image view, Choose Tools->Cursor-> Brush Size to give you a view of the area to be affected by the Eraser.
The Brush tool applies paint and is used to retouch a document.
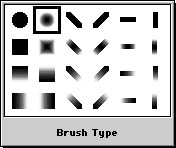 Clicking and holding on the Brush
Type pop-up opens a menu that contains the different brushes available.
The current brush has a square outline around it, and the outline follows
the cursor as you move it over the different brushes. To select a different
brush type, move the cursor over it and release the mouse button. The solid
black brush shapes indicate tools that are not antialiased (soft-edged).
Clicking and holding on the Brush
Type pop-up opens a menu that contains the different brushes available.
The current brush has a square outline around it, and the outline follows
the cursor as you move it over the different brushes. To select a different
brush type, move the cursor over it and release the mouse button. The solid
black brush shapes indicate tools that are not antialiased (soft-edged).
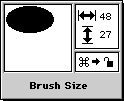 When you click on the Brush Size pop-up a box
appears where the brush size can be set. Moving the cursor within the upper
left box resizes the brush size as you move. Holding down the [Command]
key makes the sizing non-proportional. The width and height of the brush
is displayed in pixels in the box at the upper right.
When you click on the Brush Size pop-up a box
appears where the brush size can be set. Moving the cursor within the upper
left box resizes the brush size as you move. Holding down the [Command]
key makes the sizing non-proportional. The width and height of the brush
is displayed in pixels in the box at the upper right.
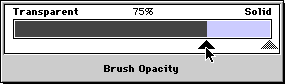 When you click on the the Brush Opacity pop-up
menu a box opens that controls the transparency of the paint. As you change
the opacity by moving the cursor over the bar, a black pointer shows the
current level and a gray pointer the previous level. The percentage readout
changes to indicate the current opacity.
When you click on the the Brush Opacity pop-up
menu a box opens that controls the transparency of the paint. As you change
the opacity by moving the cursor over the bar, a black pointer shows the
current level and a gray pointer the previous level. The percentage readout
changes to indicate the current opacity.
The Air Brush tool sprays the current foreground color on a document. Selecting the Air Brush tool adds a number of pop-up features to the bottom of the Tool palette. The Brush Type and Brush Size pop-ups are described under the Brush tool above.
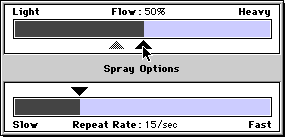 The Spray Options pop-up adjusts the
Flow and Repeat Rate of the tool. Entering a higher Flow
setting applies more paint to your document. A lower Flow setting
allows more of the document to show through. The Repeat Rate adjusts
(in seconds) how quickly paint is applied to the document. As you change
the settings by moving the cursor over the bars, a black pointer shows the
current level and a gray pointer the previous level. The percentage readouts
change to indicate the current settings.
The Spray Options pop-up adjusts the
Flow and Repeat Rate of the tool. Entering a higher Flow
setting applies more paint to your document. A lower Flow setting
allows more of the document to show through. The Repeat Rate adjusts
(in seconds) how quickly paint is applied to the document. As you change
the settings by moving the cursor over the bars, a black pointer shows the
current level and a gray pointer the previous level. The percentage readouts
change to indicate the current settings.
The Paint Bucket tool fills an area with the fill color. Selecting this tool adds a pop-up to the bottom of the Tools palette.
 The pop-up opens the Fill Sensitivity
menu. Choosing a high percentage fills the document completely. With a lower
percentage, the Paint Bucket fills until it reaches
a boundary or object defined by a color change.
The pop-up opens the Fill Sensitivity
menu. Choosing a high percentage fills the document completely. With a lower
percentage, the Paint Bucket fills until it reaches
a boundary or object defined by a color change.
Double-clicking on the Paint Bucket fills the entire document.
The Line tool lets you draw lines. Selecting the Line tool adds a pop-up to the bottom of the Tools palette.
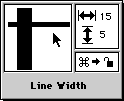 The Line Width pop-up lets you set the width
of the lines. Moving the cursor within the upper left box resizes the line
widths as you move. Holding down the [Command] key makes the sizing
non-proportional. The width of horizontal and vertical lines are displayed
(in pixels) in the box at the upper right.
The Line Width pop-up lets you set the width
of the lines. Moving the cursor within the upper left box resizes the line
widths as you move. Holding down the [Command] key makes the sizing
non-proportional. The width of horizontal and vertical lines are displayed
(in pixels) in the box at the upper right.
[Shift] + Line constrains the line to horizontal, vertical, or a 45 angle.
The Shape Object tool lets you draw filled shapes. Selecting this tool adds a number of pop-up features to the bottom of the Tools palette.
![]() The first pop-up permits selecting from rectangular,
oval, round rectangular or polygon shapes by clicking and holding on the
pop-up and moving the cursor over the shape and releasing the mouse. The
chosen shape then appears in the Tools palette.
The first pop-up permits selecting from rectangular,
oval, round rectangular or polygon shapes by clicking and holding on the
pop-up and moving the cursor over the shape and releasing the mouse. The
chosen shape then appears in the Tools palette.
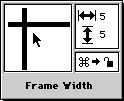 Clicking the second pop-up opens the Frame Width
pop-up, where moving the cursor within the upper left box resizes the line
widths as you move. Holding down the [Command] key makes the sizing
non-proportional. The frame thicknesses in pixels are displayed in the box
at the upper right.
Clicking the second pop-up opens the Frame Width
pop-up, where moving the cursor within the upper left box resizes the line
widths as you move. Holding down the [Command] key makes the sizing
non-proportional. The frame thicknesses in pixels are displayed in the box
at the upper right.
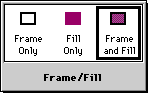
The Frame/Fill pop-up menu lets you select the frame and fill options for the shape. Frame Only draws a frame for the shape without any fill. Fill Only draws the selected shape without a frame. Frame and Fill draws the frame of the selected shape and fills it with the foreground color.
The Text tool lets you add text
to a document. When you select the Text tool, Font,
Style, Alignment and Size pop-ups are added to the bottom of the Tools
palette.
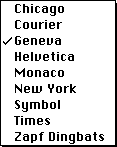 The Font pop-up menu shows all fonts installed in your System
and any loaded with third-party font-organizing products such as Suitcase
or Master Juggler. The current font is indicated with a check mark.
The Font pop-up menu shows all fonts installed in your System
and any loaded with third-party font-organizing products such as Suitcase
or Master Juggler. The current font is indicated with a check mark.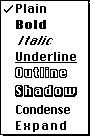
The Style pop-up lets you select the style for text. The current style is indicated with a check mark.
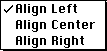 The Text Alignment pop-up lets
you choose the alignment for the text. The current alignment is indicated
with a check mark.
The Text Alignment pop-up lets
you choose the alignment for the text. The current alignment is indicated
with a check mark.
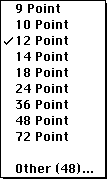 The Text Size pop-up lets you choose a point
size for the text. The current size is indicated with a check mark.
The Text Size pop-up lets you choose a point
size for the text. The current size is indicated with a check mark.
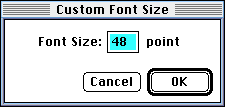 Choosing Other opens a dialog box where
you can enter the point size for the type in the textbox.
Choosing Other opens a dialog box where
you can enter the point size for the type in the textbox.
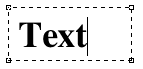 Clicking on a document with the Text tool
creates a rectangular box with a cursor in it. Text can be entered by typing
or by pasting from the Clipboard, with most of the normal text editing features
available.
Clicking on a document with the Text tool
creates a rectangular box with a cursor in it. Text can be entered by typing
or by pasting from the Clipboard, with most of the normal text editing features
available.
Double-clicking on a word in the text box selects it, and clicking while holding down the [Shift] key extends the selection. The text box can be resized by clicking on one of the handles at the corners of the text box and dragging. [Shift] clicking the handles constrains the box to the aspect ratio of the original. [Command] clicking the handles varies only the width of the text box.
 Double-clicking on the Text tool
converts text to a floating paste selection. Clicking outside the box, choosing
Selection->Select None [Command-D] or using a different tool after
entering the text drops it onto the image. Once no longer selected, the
text becomes part of the underlying image and is no longer editable through
typing.
Double-clicking on the Text tool
converts text to a floating paste selection. Clicking outside the box, choosing
Selection->Select None [Command-D] or using a different tool after
entering the text drops it onto the image. Once no longer selected, the
text becomes part of the underlying image and is no longer editable through
typing.