 CHAPTER 4: WEBPAINTER MENUSCHAPTER 4: WEBPAINTER MENUS
About WebPainter presents a dialog box that contains important WebPainter Program information
(including the program version number).
New
Creates a new document using the
settings of the last created document (window size, orientation and bit depth) or with the settings of what
is in the clipboard. Command N will
perform the same function.
Open
Opens a previously created animation document. You can have
multiple documents open at once. Command O will perform the
same function.
Close
Closes the current animation document. Command W will
perform the same function.
Save
Saves the active document to the WebPainter File Format (pressing the Option key prior
to opening the File menu changes the command to Save All, which saves
all open documents).
WebPainter File Format
This is the file format for documents created in WebPainter. It is not a standard format recognized by other applications, because it saves current tool, fill, and line information, and other settings. If you plan to open a WebPainter animation in another application, save the animation in QuickTime or PICs format.
Save A Copy As...
Lets you name and save an untitled document, or save a copy
of an existing, open document under a new name. Command S will perform
the same function.
Revert to Last Saved Document
Replaces the current document with the new version
that was last saved.
Page Setup
Presents a dialog box of printing options, such as paper
size and orientation. The contents of the dialog box depend on the the currently
chosen printer.
Print
A print dialog box to appears, allowing you to print
the active document. Command P will perform the same function.
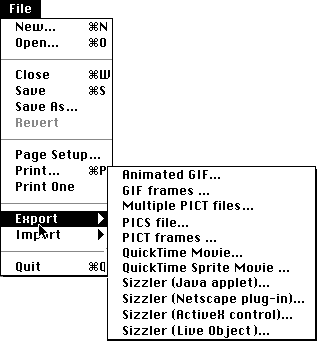
Export
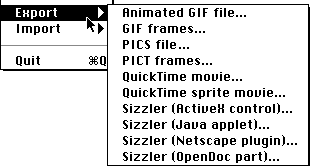
You can export the active document to an animated GIF, GIF frame, sequential PICT frames, PICS file, QuickTime Movie, QuickTime sprite movie or Sizzler file. The Sizzler file can be in the form of Java applet, Netscape plug-in, ActiveX control or LiveObject part.
Animated GIF or GIF89a
GIF stands for Graphics Interchange Format. GIF is well known for its highly compressed file format. The compression method used on GIFs is called LZW compression (based on work done by Lempel-Ziv and Welch) which is a lossless method of reducing file size. Even though lossless compression offers higher quality than lossy compression, the resulting files might look worse than a 24-bit lossy compressed JPEG (JPEGs is a graphics format created by Joint Photographic Expert Group) because GIFs have to be 8 bits. Thus GIF files can only contain 256 colors or less.
There are two types of GIFs: GIF87a's and GIF89a's. GIF87a is a standard single image GIF file format. GIF89a is the more advanced animated GIF file format. GIF89a adds the ability to attach extra information to the file such as transparency and multiple frames. Transparent GIFs have regions that can be invisible. Interlaced GIFs can be in either formats. Interlaced GIF87a's appear on the Web screen in chunks, starting at low resolution and resolving after several seconds to their finished form. Interlaced animated GIFs will only interlace the first frame of your animation. Both cause the graphic to appear sooner than if it had to download fully before being viewed.
While GIF89a just recently made its way into the spotlight, the technology has actually been around for years. (The "89" in its name refers to the year the specification was created.) Netscape revived interest in the technology when it listed animated GIFs as a feature in its release notes for Navigator 2.0.
Why use GIF89a?
While Sizzler, Java and CGI scripts all let developers add motion to Web pages, animated GIFs have one main advantage over these technologies: you can view a GIF89a image with almost any browser without a plug-in or add-on. It should be noted, however, that some browsers don't offer full animated GIF support.
How does GIF89a work, and what are the disadvantages?
When you view an image created with GIF89a, it is downloaded from the server and then played in the browser. If you do not have a large enough local cache, the animation will be reloaded from the server. If this is the case the animation will be downloaded for each frame of the animation, as well as for each iteration of the loop. This eats up bandwidth and possibly CPU cycles.
That's the downside. For another, the animated GIFs can be annoying: there's a reason why people have abandoned the idea of putting blinking text on their Web pages, and that's an even better reason to avoid blinking animations.
Besides being distracting, images can force your hard drive to drive hard--constantly reading the same graphic every fraction of a second from its cache file. The animations can also interfere with your ability to activate links or use your browser's buttons. The secret to avoiding this trap is to continuously click on the browser's Stop button until the image has stopped reloading.
Another limitation of animated GIFs is that you can't attach sounds or interactivity; for these features, you still need something like Sizzler or Java. And although most browsers support GIF89a, some show only the first or the last frame of the animation, while others don't even allow loops.
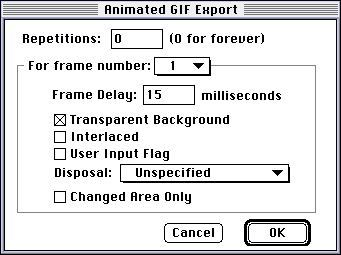
The above animated GIF export dialog allows the user to set certain properties.
GIF89a is used when exporting WebPainter documents to GIF file format. The
user can specify the number of times to loop the animation. For a single
frame or for all the frames, the user can also specify the delay time before
displaying the next graphic, the wait for user input (user input flag) and
how the frame should be removed after it has been displayed (disposal).
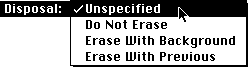
Unspecified
The effects of this option depends on the Web browser
that is being used. Netscape treats this as Do Not Erase
Do not Erase
The current graphic will remain while the next cel draws.
Erase with Background
The current graphic is erased with the background
before the next cel draws.
Erase with Previous
The current graphic is erased with the previous
cel before the next cel draws.
Changed Area Only
By clicking this checkbox, the cels in the GIF will only change in the areas
where animation takes place. If you deselect this box and choose
"erase with background"
you can create transparent backgrounds.
Most Web Browsers support Animated GIFs, but not all browsers support
all the features mentioned above. Check with your browser provider
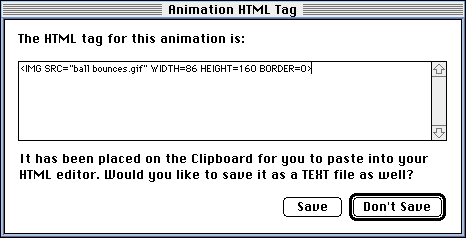
for details. To include GIF animation on your Web site, add the following
tag to your HTML code.
<IMG SRC="ball bounces.gif" WIDTH=86 HEIGHT=160 BORDER=0>
When exporting a graphic file with WebPainter, the above tag is automatically saved to the clipboard and you have the option of saving the tag to a standalone file.
GIF Frames and PICT Frames
WebPainter can also export files to GIF and PICT frames. These options provide WebPainter a way of exporting individual pictures as well as formats recognised by other applictaions.
QuickTime Movies
WebPainter saves the animation in its native format automatically. To save as a
QuickTime movie you have to "export" as QuickTime.
When exporting QuickTime movies, you have the option of setting the QuickTime movie's properties. Properties include the different compressors and the quality and the speed of the movie playback.
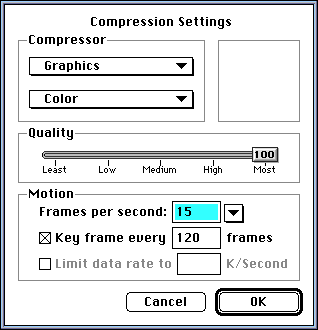
"Graphics" is the default compressor, but others are available as shown below.
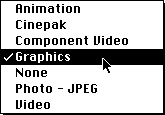
Each one of the options represents the suggested compression method for the type of graphic, ie. animation compression is good for animations, graphics are good for still graphics.
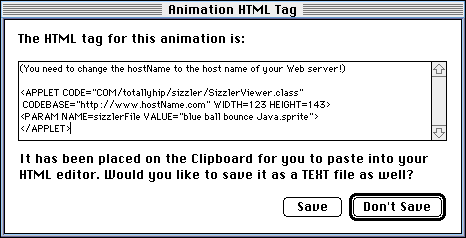
Sizzler Sprites
The Sizzler Sprite format is a component of Sizzler. Sizzler is a multimedia player that allows you to view stream based animations on web pages. Streaming allows you to view animationsin real-time immediately, instead of waiting for the entire image to download completely before viewing.
With WebPainter's capability of exporting into Sizzler files, all the users
need is to download is the Sizzler browser add-on from Totally-Hip's Web site at
"www.totallyhip.com". Sizzler browser add-ons are available on both Mac
and Windows platforms.
To start a sizzler animation, just place an EMBED tag into your HTML
document e.g.
JAVA Animation
Rather than creating a browser add-on for each targeted operating system to make use of Sizzler's streaming animation, a Java applet can be used. Java is an object-oriented language developed by Sun Microsystem Inc. The reason it was developed was to accomidate the internet's multi-platform audience. To be Java-enabled, the user's/client's computer system must have a Java interpreter. This interpreter is usually a built-in option inside the Web browsers such as Netscape's Navigator and Microsoft's Internet Explorer. Once the connection between the Web server and the client is estabished, Java applications (or applets) may be downloaded.
The following HTML tag is needed to use Java applets.
Import

Lets you import an image or a series of images into a new document. You can import GIF, PICS, PICT files or a QuickTime Movie through the submenu.
Quit
Closes WebPainter and returns to the Desktop. All open documents
will be closed. Command Q will perform the same function.
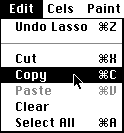
Cut
Removes the selected graphics from the document and
places them on the Clipboard.
Copy
Places a copy of
the selected graphics on the Clipboard.
Paste
Command places
a copy of the graphics on the Clipboard into the active cel.
Pasting into the Paint Layer
When you choose Paste from the Edit menu, or use the Command-P shortcut, the contents of the Clipboard is pasted into the selected area of the document window. Paste, pastes the contents of the Clipboard into the current cel of the active document. If the document is in the Background layer then the graphic will be placed in the background, if the document is in the foreground then the graphic will be placed in the foreground.
Undo
Reverses the last action performed in the document. The Undo
menu item can change depending on the tool or command that you used last.
The Undo menu item will change to Redo depending on the tool or command
that you last used.
Clear
Deletes the selected graphics from the document without placing
them on the Clipboard.
Select All
Selects the entire working area of the active document,
but does not select all the cels in the document. When in the Background layer,
Select All will select the entire contents of the Background layer.
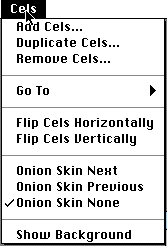
Add Cels
Adds new cels to the active document. A dialog box will
appear allowing you to enter the number of new cels you want to add.
Duplicate Cels
Duplicates an existing cel in the active document.
A dialog box will appear allowing you to enter the number of cels you
want to duplicate.
Remove Cels
Removes an existing cel or a number of existing cels
in the active document. A dialog box will appear allowing you to enter the
number of cels that you want to remove.
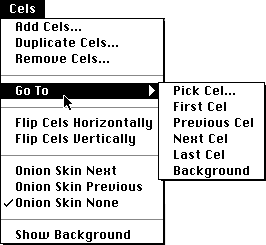
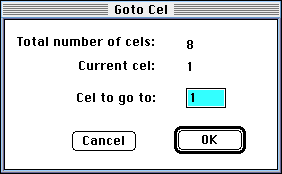
Pick Cel
Will go to an existing cel in the active document. A dialog
box will appear allowing you to enter the number of the cel that you want
to go to.
First Cel
Goes to the first cel in the active document.
Next Cel
Goes to the next cel in the active document.
Previous Cel
Goes to the previous cel in the active document.
Last Cel
Goes to the last cel in the active document.
Background
Goes to the background cel within the active document
window. This is the same as using the toggle button (little man or backdrop
picture) in the top right of the active document window.
Flip Cels Horizontally
Flips all selected cels in the animation horizontally.
Flip Cels Vertically
Flips all selected cels in the animation vertically.
Onion Skin Next
The next cel
in the active document will be ghosted allowing you to view certain
changes in the cels of the active document.
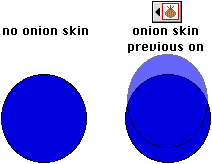
Onion Skin Previous
The previous cel in the active document will be ghosted allowing
you to view certain changes in the cels of the active document.
Onion Skin: None
Turns off the onion skin feature so that only the
active cel will appear.
Show Background
Displays the background for all the cels.
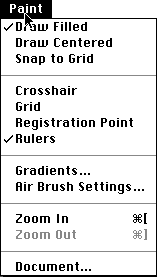
These are basic features found in most painting programs.
Draw Filled
A complimentary function that comes with the shape
tool. By placing an X in this menu function, all shapes will be drawn
with a solid fill. If draw filled is not selected, only an outline will be drawn.
Shortcut: Double-click on any shape tools will have the same effects.
Draw Centered
Allows you to draw symetrical lines or shapes
by positioning the pointer at the center of the object. If not selected shapes
and lines will be drawn from corner to corner and one end to another respectively.
Snap to Grid allows lines to be drawn based on a squared grid template rather than drawing lines in freeform. This drawing option applies to the Line, Rectangle, Rounded Rectangle and Circle Tools.
Cross Hair
Contrains the cursor to an extended line cursor
that points to the measurement of the vertical and horizontal ruler. Used
for precise measurement of shapes and objects.
Registration Point
A reference point used for placements of images in animation.
This menu item is the same effect as the registration point button on the
Color Tools palette.
Rulers
Provide measurement of the animation image in pixels.
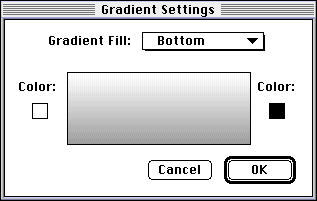
Gradient Fills
A gradient, or a graduated fill, blends two or more shades of colors providing a smooth
transition from one to another. A gradient can be used as the foreground
fill in both the Paint and Draw layers. Selecting this option
will open the Gradient setting dialog allowing you to adjust
the color in the gradient fill. Gradient types include Shape, Circular, Top, Top
Right, Right, Bottom Right, Bottom, Bottom Left, Left and Top Left.
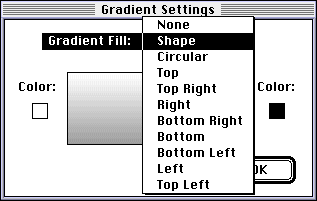
The above diagram shows the different gradient types available for gradient fill.
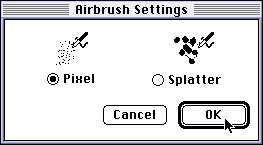
Air Brush Settings.....
Brings up the Air Brush Settings dialog for
choosing either the Pixel or Splatter Air Brush.
Zoom Tool
Functions the same as the magnifier tool ![]() except that the focus of magnification is on the user's left top
corner of the editing window.
except that the focus of magnification is on the user's left top
corner of the editing window.
Short cut: To zoom in is ![]() and to zoom out
is
and to zoom out
is ![]() .
.
Document
Opens the Document Dialog. For a detailed description of
the Document Settings, see Chapter 5.
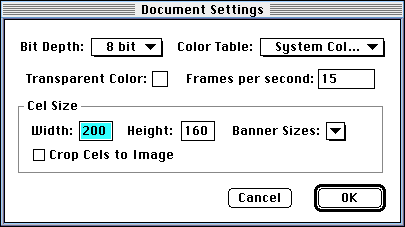
Document Settings
Dialog allows you to set the document size, bit
depth and crop the cels to the image etc.
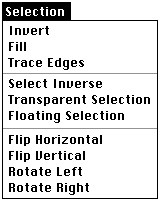
Invert
Reverses the color white to black and vice versa.
Fill
Will fill the selected area with the foreground color.
Trace Edges
Selects the edges of any shape in the document window.
Select Inverse
Deselects the selected area or selects an
area that was not selected before. If the entire image is selected, Select
Inverse will simply cancel the selection.
Transparent Selection
Allows the transparent color to show through
to the background.
Floating Selection
Allows any area selected (Rectangular, Lasso,
Magic Wand or "Select All") to float on top of
any cels and background. By changing the editing cel focus and then deselecting
the selected area, the selected area will be cut and pasted onto the new
cel automatically.
Flip Horizontal
Flips the current cel horizontally.
Flip Vertical
Flips the current cel vertically.
Rotate Left
Rotates the current editing image counter-clockwise by 90
degrees.
Rotate Right
Rotates the current editing image clockwise by 90 degrees.
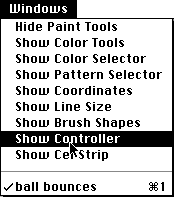
These menu items allow you to show or hide the palettes and access open
documents. The following are palettes available inside WebPainter:
Paint Tools, Color Tools, Color Selector, Pattern Selector, Coordinates,
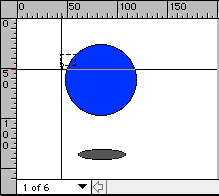
Line Size, Brush Shapes, Controller, Cel Strip, Document 1: Bouncing ball
- the editing window.
Once a palette is shown, the window menu will automatically indicate that
only the "Hide" mode is available for that palette. Similarly
if a palette is hidden, the window menu will indicate that the palette can
only be shown.