 CHAPTER 1: INSTALLATION
This chapter provides step by step instructions for installing the WebPainter
application and associated files and adjusting the memory for WebPainter,
if necessary.
System Requirements
To run WebPainter your system must meet the following requirements:
- 68020 processor or better. For best performance, we recommend a 68040 or a PowerPC processor
running system 7.0 or later.
- Color Monitor
- CD-ROM Drive
- Minimum 4 MB of RAM. 8 MB of RAM is recommended to run other programs concurrently with
WebPainter or edit larger animations.
- 4 MB Hard Drive space, 8 MB recommended
- To use the QuickTime Import/Export feature you must have QuickTime 2.1 or later installed in
your system folder.
- To use Sizzler Sprite animations you should have the Sizzler plug-in availible for Netscape Navigator,
Apple Cyberdog Part, ActiveX Control for Microsoft Internet Explorer. All versions have been included
with the application. You can download the latest version from our site at http://www.totallyhip.com.
Installing WebPainter
Basic Program Setup
The WebPainter package comes with its own custom installer. Simply click
on the following icon to start the installation process and then follow the instructions.

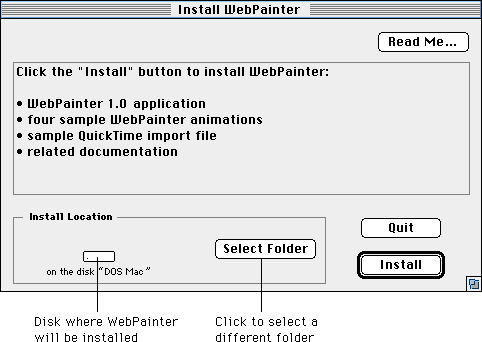
The WebPainter Install window allows you to check the install location and supplies you with a read
me file for WebPainter.

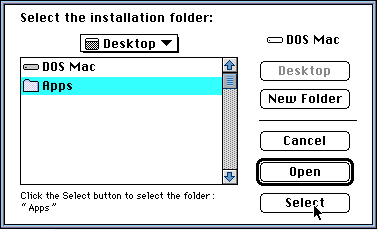
When the user clicks on the "Select Folder" button, the following dialog
box will be shown. Click on the desired installation
folder and click the "Select" button.

During installation, you will be given the choice
of installing two different versions of the WebPainter software. The first version contains code specific to the type
of machine you are using (68000 or PowerPC) . The second version will run on both 68000 or PowerPC machines, but
requires about 600k in memory.
In short,
The following is a picture of the dialogue that will appear
Click Yes to Install the "fat" version of WebPainter
Click No to automically detect the type of your machine (68K or PowerPC) and install
the "lean" WebPainter.

At the end of the installation, you will be asked either to continue
or to quit the installation. To complete the installation, click Quit. If
additional installations are required, click Continue to reinstall the program

Package Contents
Inside your CD-ROM or Download package you should have the following:
- WebPainter application
- WebPainter Online/HTML Manual
- WebPainter Self Contained Manual
- WebPainter License Agreement
- Sample Animations folder
- WebPainter Read Me File
- WebPainter Response Form (for responding to bugs etc.)
- Sample Import Files
- Sizzler Browser add-on
Getting Started
Before using WebPainter, you should be familiar with the basics of Macintosh
painting programs. WebPainter furnishes you with the tools to create animated
graphics. It is similar to most painting programs; however, it allows you
to create multiple cel documents or animation files for use on the Web.
WebPainter is a companion program to Totally Hip's Sizzler Browser Add-ons. At time of
this manual printing, Totally Hip had full support for Apple's Cyberdog,
Microsoft's Internet Explorer and Netcape Navigator and Java Applets. A Web page authoring tool such
as Adobe PageMill, Claris Home Page or Softquad Hotmetal Pro
will be necessary to add the final Sizzler animations to your Web site.
System Requirements
You will need the following system requirements to run WebPainter:
- 68020 processor or better. For best performance, we recommend
a 68040 or a PowerPC processor) running System 7.0 or later.
- Color monitor.
- Minimum 4 MB of RAM. 8 MB RAM is recommended to run other programs concurrently with
WebPainter or edit larger animations.
- To use the QuickTime Import/Export feature you should have QuickTime
2.1 or later installed in your System Folder.
- To use the Sizzler Sprite animations you should have the Sizzler
plug-in availible for Netscape Navagator, Apple Cyberdog Part, ActiveX Control for Microsoft Internet Explorer. Download the latest
version of Sizzler from our site at http://www.totallyhip.com.
- 4 MB Hard Drive space, 8MB recomended
Adjusting memory
Macintosh computers allow you to allocate a certain amount of memory
for each application. The user can change the amount of memory reserved
for WebPainter.
If you plan to work on an especially large document, or work on multiple
files, the user may need to increase the amount of memory allocated for
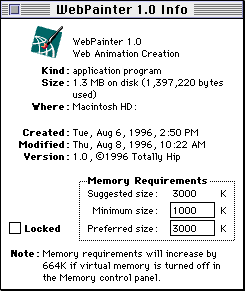
WebPainter. Try increasing the size to 3000K or to 4000K if you have enough
computer memory. Although the memory for WebPainter can be reduced, the
user should avoid specifying less memory than the suggested size in the
WebPainter Info dialog box.
To change the memory allocation for WebPainter:
1. If WebPainter is open, quit the application.
2. Open the WebPainter Folder and click the WebPainter application icon
once.
If you click the application icon twice, you start WebPainter. If that happens,
choose Quit from the File menu and try again.
3. Choose Get Info from the File Menu.
You see the WebPainter Info window

4. Double-click the "Preferred Size" box.
5. Type a number to change the memory size. An increased memory partition will increase speed and stability.
6. Close the WebPainter Info window.
The new memory partition will be activated the next time you start WebPainter.
Registration and Technical Support
In order to provide you with product upgrade information and techincal
support, please register your copy of WebPainter either by sending us your
registration card or filling out the registration form on Totally Hip's
Web site at www.totallyhip.com.

[Chapter 1: Installing]-[Chapter
2: Tutorial]-[Chapter 3: Tools, Palettes
& Documents]
[Chapter 4: Menus]-[Chapter
5: Document Settings]-[Chapter 6: Basic
Web Concepts]
[Appendix]
![]()


