CHAPTER 3: Tools, Palettes and DocumentsCHAPTER 3: Tools, Palettes and Documents
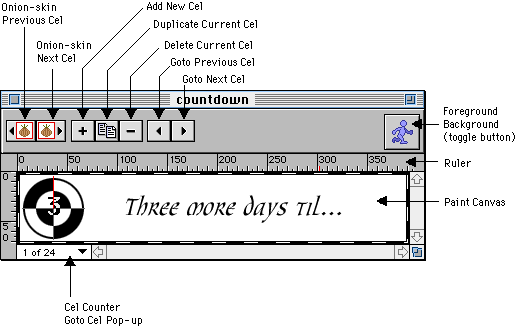
![]() Foreground/Background Toggle
Foreground/Background Toggle
This button allows you to alternate the editing area between a static background or foreground.
![]() Onion Skin Toggle
Onion Skin Toggle
By selecting onion-skin previous or next button, you are showing a transparent (ghost) image of the previous or the next cel
is displayed in the current cel.
![]() Add A New Cel
Add A New Cel
When this button is clicked, a new empty cel is created which will appear after the current cel.
![]() Duplicate Cel
Duplicate Cel
When this button is clicked, the current cel is duplicated. This new cel will appear after the selected cel.
![]() Delete Cel
Delete Cel
When this button is clicked, the selected cel is deleted.
![]() Go to previous cel
Go to previous cel
When this button is clicked the previous cel will appear. When the button is clicked down continuously, the animation will be
played in reverse.
![]() Go to next cel
Go to next cel
When this button is clicked the next cel will appear. When the button is clicked down, the animation will continuously play.
![]() Cel Counter
Cel Counter
The cel counter at the bottom left corner of the document window indicates the current cel.
By clicking on the down arrow you can move to another cel or the background.
![]() Rulers
Rulers
The ruler can be turned off or on in the "Paint Menu".
Tool Pointers
The on-screen indicator or cursor, may change depending on the tool selected. Many tools have pointers that resemble their icons, such as the pencil. Other pointers match their function, such as a spray pattern for the Spray Can, or a square for the Eraser. Each pointer has a hot point: the spot that "counts". For instance the tip of the Pencil draws a line.
Click Shortcuts
There are a number of Keyboard shortcuts in WebPainter that make it quicker for you to acces frequently used functions. Double-clicking the Paint Brush displays the brush Shapes palette. Shortcuts are detailed with the discussion of each tool. (See Appendix A for a summary of the Shortcuts and Keyboard Tool Modifiers)
Keyboard Tool Modifiers
Many tools have keyboard modifiers. Pressing the Shift, Option, or Command keys individually or together restricts or modifies the action of the tool. For instance, pressing the Shift key constrains many of the tools to horizontal-only or vertical-only operation. Modifiers are addressed in the discussion of each tool.
Tool Configurations
The operation of many of the tools can be altered to suit
your purposes. These tools are configured through dialog boxes or palettes
displayed by menu commands, or by double-clicking the tool icon on its palette.
The specifics of tool configuration are covered with each tool description.
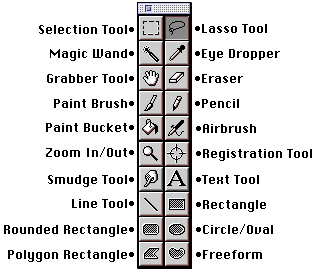
Use the Marquee Selection Tool to make a rectangular selection in the document window.
The Lasso Selection Tool allows you to select an irregular or freehand section of the image in the document window.
Use the Magic Wand to make selections based on the color similarities of the adjacent pixels. This tool is useful when you want to select part of an image without tracing the outline with the lasso tool.
The Eye Dropper picks up the color beneath the tip of the tool. The color is applied to the foreground of the Line Fill or Area Fill.
The Grabber moves the document in the window. Using the Grabber to drag the document has the same effect as moving the scroll bars.
![]() Eraser
Eraser
The Eraser is used for erasing sections or areas of the image in the document window.
Use the Paint Brush to paint freeform strokes with the foreground color. The paint brush tool creates strokes that are not as hard edge as lines drawn with the pencil tool and not as soft as the strokes painted with the air brush tool.
Use the Pencil to draw hard-edge freehand or straight lines with the foreground
color.
![]() Paint Bucket
Paint Bucket
Use the Paint Bucket tool to fill selected areas with the foreground color.
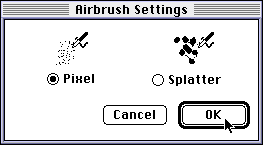
![]() AirBrush
AirBrush
Use the Air Brush tool to lay down a diffused spray of the foreground color. To darken a color, apply multiple strokes over the same area. There are two kinds of AirBrush settings available: Pixel and Splatter. Their illustrations are shown in the AirBrush Settings dialog.
The Magnifier changes the current level of magnification. Select the Magnifier tool - the magnifying-glass cursor displays a plus sign - and click anywhere in the document window to zoom in one level of magnification.
![]() Registration Tool
Registration Tool
The Registration Tool allows you to set a reference
point for the animation. The registration point will stay constant throughout
each cel of the document and will not appear in the final animation.
To deselect the registration
point, uncheck the Registration Point under the Paint Menu.
![]() Text Tool
Text Tool
Use the Text Tool to type or enter bitmapped text on an image.
To add text:
To draw a line:
Rectangle , Rounded Rectangle, Oval, Multigon, Freeform
The Shape tools - Rounded Rectangle, Rectangle, Polygon, Oval, and Freeform - produce symmetric shapes that are filled with the current Foreground color, and outlined with colors of current Line Fill and widths of the Line Widths.
The Color Tools palette allows you to:

The Color Tool Palette can be shown or hidden with the use of the Window
Menu items.
Foreground Color.
To choose a new Foreground Color:
Background Color
Gradient Fill
A gradient fill gradually blends one color into another.
Patterns Palette
To choose a new Fill Pattern:
Recent Colors
To choose a Most Recent Color:
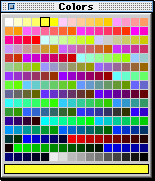
Standard 8-bit Color Palette
1-bit palette has 2 colors; 2-bits has 4; 4-bits has 16 and 8-bits has 256
colors. WebPainter defaults to an 8 bit color palette.
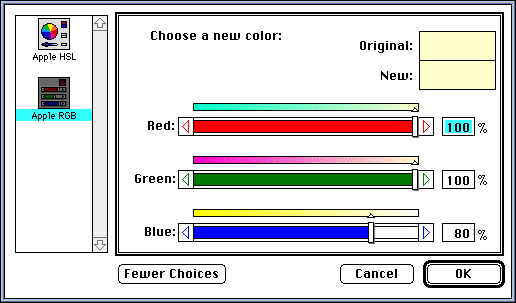
Customizing the Palette
Double-click the color palette to make the following dialog that allows the you to choose the color you want. The default color picker is Apple RGB but you may use other color pickers if you have them installed.
Different Color Bit Depths
The document dialog allows you to adjust to the various bit depth from 1 to 24 bits. This can be translated from 1 to approximately 16 million colors.
| Bit Depth | Number of colors |
| 1 | 1 |
| 2 | 2 |
| 4 | 16 |
| 8 | 256 |
| 16 | 65,536 |
| 24 | 16 million (approx.) |
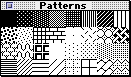
The Pattern palette allows you to select a pattern type. The Patterns
palette can also be accessed from the Color Tools Palette through the Patterns
pop-up.
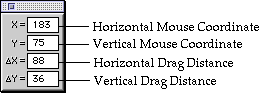
Horizontal and Vertical Mouse Coordinates
These coordinates mark the position of the cursor in the document window.
Horizontal & Vertical Drag Distance
These coordinates mark the difference between the starting coordinates and
the current position of the cursor.
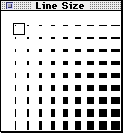
The Line Size palette allows you to select the line size. The Line Size
palette can also be accessed from the Color Tools Palette through the Line
Size pop-up menu.
Changing the Line Width:
You can change the width of the line on frames around shapes by choosing
a different line size from the Line Size Selector palette.
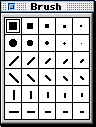
The Brush Shape palette allows you to select a brush shape and size. The Brush Shape
palette can also be accessed from the Color Tools Palette by double-clicking
the brush tool ![]() .
.
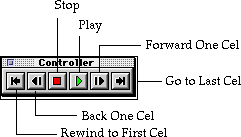
Similar to most video control panels, you can rewind, fast forward (Go to Last Cel), stop, play, step back and step forward one cel at a time with the controller.
The speed of the playback is the same as the frame rate stated on the document
setting.
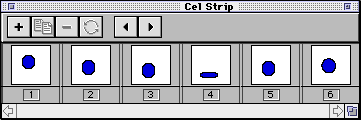
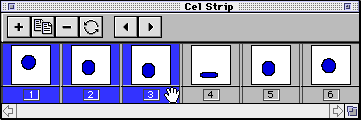
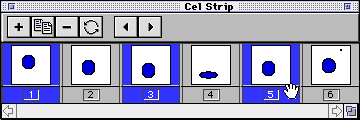
Cel Strip displays all the available cels in an animation.
By clicking on the desired the cel will be highlighted and
will occupy the document window. As indicated on the Cel
Strip's header buttons, you can add, rotate,
duplicate and remove cels as well as moving back and forth between cels.
Other functions include the following: